


Spring is the perfect time to refresh, restore, and prepare your landscape for the months ahead. At Suncor Outdoors, our team is ready to help your property look its absolute best with seasonal services designed to improve curb appeal, plant health, and long-term landscape performance.
Whether you’re preparing your home for outdoor gatherings or simply want a clean, polished look for the season, our spring services make it easy.
Mulching helps retain moisture, regulate soil temperature, suppress weeds, and give your landscape beds a finished, professional look.
Our team installs premium mulch with proper bed preparation so your property looks neat, healthy, and well-maintained all season long.
Popular options include natural hardwood, black mulch, and brown mulch.
Our seasonal flower installations feature vibrant annuals selected specifically for our climate and the time of year. We design beds that complement your home and create eye-catching curb appeal from the street.
From entryways and front beds to patio planters, we create color that lasts throughout the season.
Our fertilization programs provide the nutrients your lawn and plants need to thrive through the growing season. With the right balance of nutrients applied at the right time, your lawn grows thicker, greener, and stronger.
Regular fertilization helps improve root development and protects against seasonal stress.
Our weed and feed treatments target unwanted weeds while strengthening your turf at the same time. By combining weed control with lawn nutrition, we help your lawn stay dense, healthy, and resistant to future weed growth.
Early spring treatments are one of the most important steps in maintaining a beautiful lawn.
Our team trims trees and shrubs to maintain shape, remove dead or overgrown branches, and promote healthy growth. Strategic trimming improves airflow, enhances plant health, and gives your property a well-maintained appearance.
It’s one of the simplest ways to elevate the overall look of your landscape.
As a thank you for your continued loyalty, current Suncor Outdoors customers will receive 10% off any additional spring services that are outside of your current maintenance agreement.
If you’ve been thinking about adding fresh mulch, seasonal flowers, or additional trimming, now is the perfect time.
Our spring schedule fills up quickly, and the best results come from getting ahead of the season.
Contact Suncor Outdoors today to schedule your spring services and give your landscape the refresh it deserves.
📞 Call: (281) 859-2122
📧 Email: info@suncoroutdoors.com
🌐 Visit: SuncorOutdoors.com

Crape myrtles (Lagerstroemia) are beloved for their stunning summer blooms, striking bark, and graceful form. However, to keep them healthy and looking their best, an annual trimming is essential. Many gardeners make the mistake of either over-pruning or neglecting their crape myrtles entirely, leading to weak growth and diminished flowering.
Here’s why a once-a-year trim is vital for the long-term health and beauty of these landscape favorites:
Regular pruning helps remove dead or diseased wood, allowing the tree to direct its energy toward producing strong new growth. Trimming also improves air circulation, reducing the risk of fungal diseases such as powdery mildew and sooty mold.
Crape myrtles bloom on new wood, meaning that properly timed pruning in late winter or early spring stimulates the growth of new flower-producing branches. Without annual trimming, your tree may produce fewer and smaller blooms.
Left untrimmed, crape myrtles can become overgrown with weak, crossing branches that are prone to breaking. Strategic pruning strengthens the structure of the tree and encourages a balanced, aesthetically pleasing shape.
Crape myrtles often produce suckers—vigorous shoots that sprout from the base of the tree or lower branches. These can divert energy from the main canopy, leading to a cluttered appearance. Annual trimming helps remove these unwanted shoots and keeps the tree looking tidy.
A well-pruned crape myrtle maintains its natural beauty, with a balanced canopy and a graceful silhouette. Avoid the harsh practice of “crape murder” (severe topping), and instead, aim for selective pruning to enhance the tree’s natural shape.
By trimming your crape myrtle once per year in the late winter or early spring (before new growth starts), you’ll enjoy a healthier, more beautiful tree that produces vibrant blooms every summer. By removing dead, diseased crossing branches and suckers at the base along with proper care, your crape myrtles will thrive for many years, adding elegance and charm to your landscape.
Don’t worry! You don’t have to tackle it on your own, Suncor can help. Just give us a call at (281) 859-2122 or shoot us an email to info@suncoroutdoors.com and we can get you on the schedule.

There’s only 16 Saturday’s until Christmas! Can you believe it? We are starting to prepare for the upcoming holiday season. As in previous years, we will be running the Christmas light schedule by neighborhood. There are limited installs per day this year, so make sure to grab your spot early!
Here’s a few ways we can help with your lights:
To get a quote, or schedule your date for holiday light install this year, please click below and fill out the form. Once we receive your submission we will reach out to setup your estimate or confirm your install date.
We have plenty of free dates prior to Thanksgiving this year. Reach out to secure your spot today!
Please feel free to contact us at (281) 859-2122, or on our website at suncoroutdoors.com with any questions.

When the temperature drops pool owners shouldn’t worry if water freezes across your pool’s surface. Your main concern should be with your pool pipes and equipment. If your pool equipment isn’t winterized, water can freeze inside of your pump, filter or heater damaging these components so it’s important to keep water flowing through your pool’s system the entire time the temperature is freezing.
There are things you can do to prevent costly repairs and replacement:

Freezing temperatures don’t happen too often in Houston, but when they do, it’s important to prepare! With the arctic blast scheduled to hit Houston on Thursday, taking the time to prepare your home and yard for the freeze could save you hundreds of dollars on burst pipes.
Follow the steps below to remove water and winterize your irrigation system.
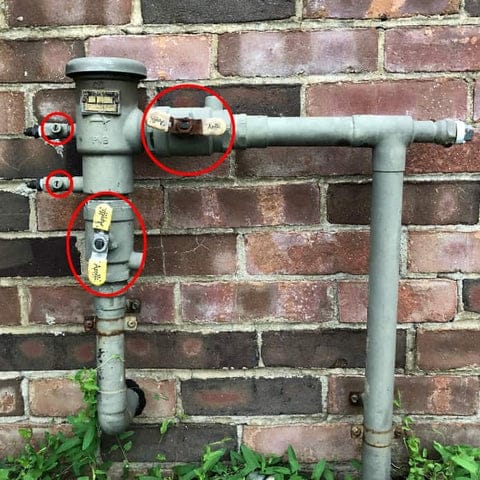
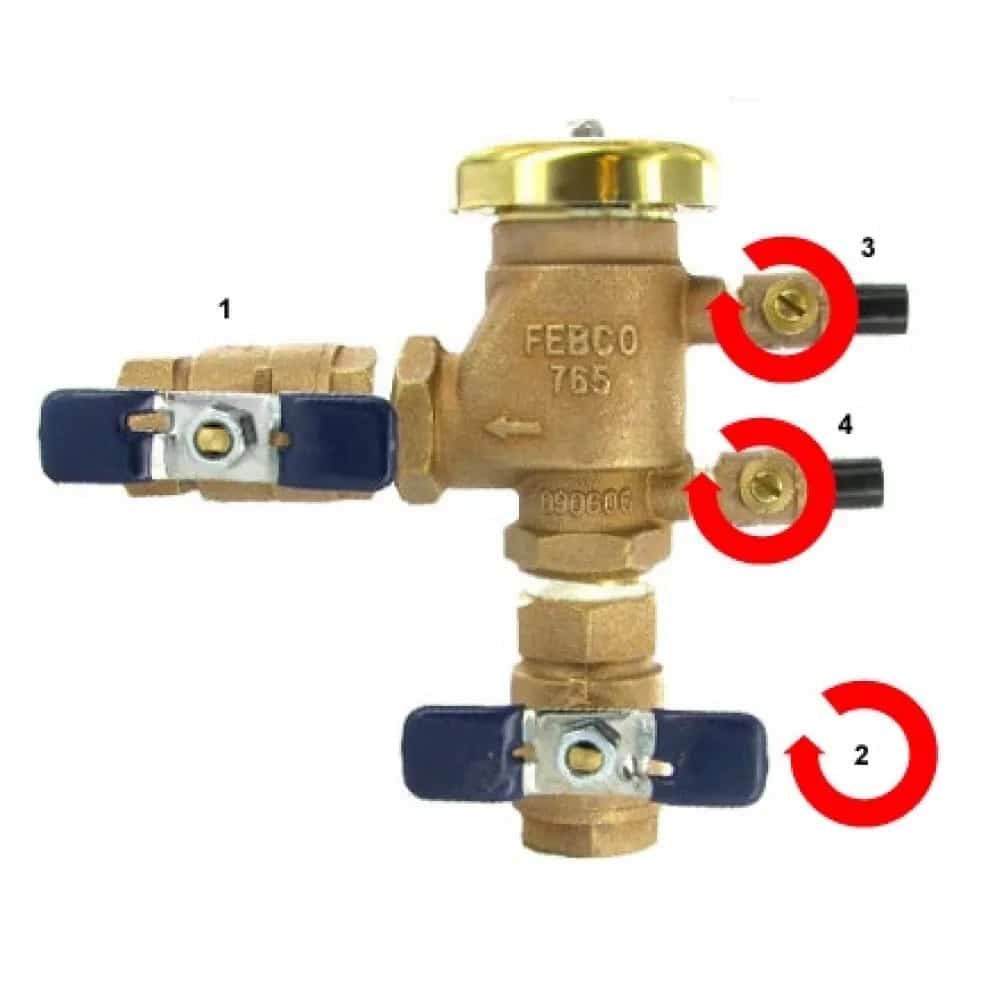
On most residential backflow devices, there are two shut-off valves. These are typically covered in blue rubber and are located before and after the actual backflow device.
Now that you have shut off the water valve, you must release the water that is in the device so that it doesn’t expand when it freezes and crack the device. With a flat head screwdriver, loosen the two bleeder valves (#3 and #4 as illustrated). The bleeder valves are usually located just under the plastic top of the backflow. Sometimes, they have rubber inserts you have to remove before you can see the flathead screw. When opening these, be aware that the water will spew out for a few seconds and your hands will get wet. NOTE: If the water doesn’t stop spitting out after a couple minutes, you haven’t fully turned off the water in step 1.
This will allow the water to expand and freeze without being hindered and causing damage.
At almost all home improvements stores, they carry backflow preventer insulation materials. Amazon and other stores also carry insulated bags that can be slipped over your backflow and secured with velcro.
Following the above steps will help depressurize your system and prepare it for the freeze. There are so many variables that can cause one residents irrigation to freeze and the next door neighbors not to freeze, the biggest being is your backflow preventer being exposed to the north.
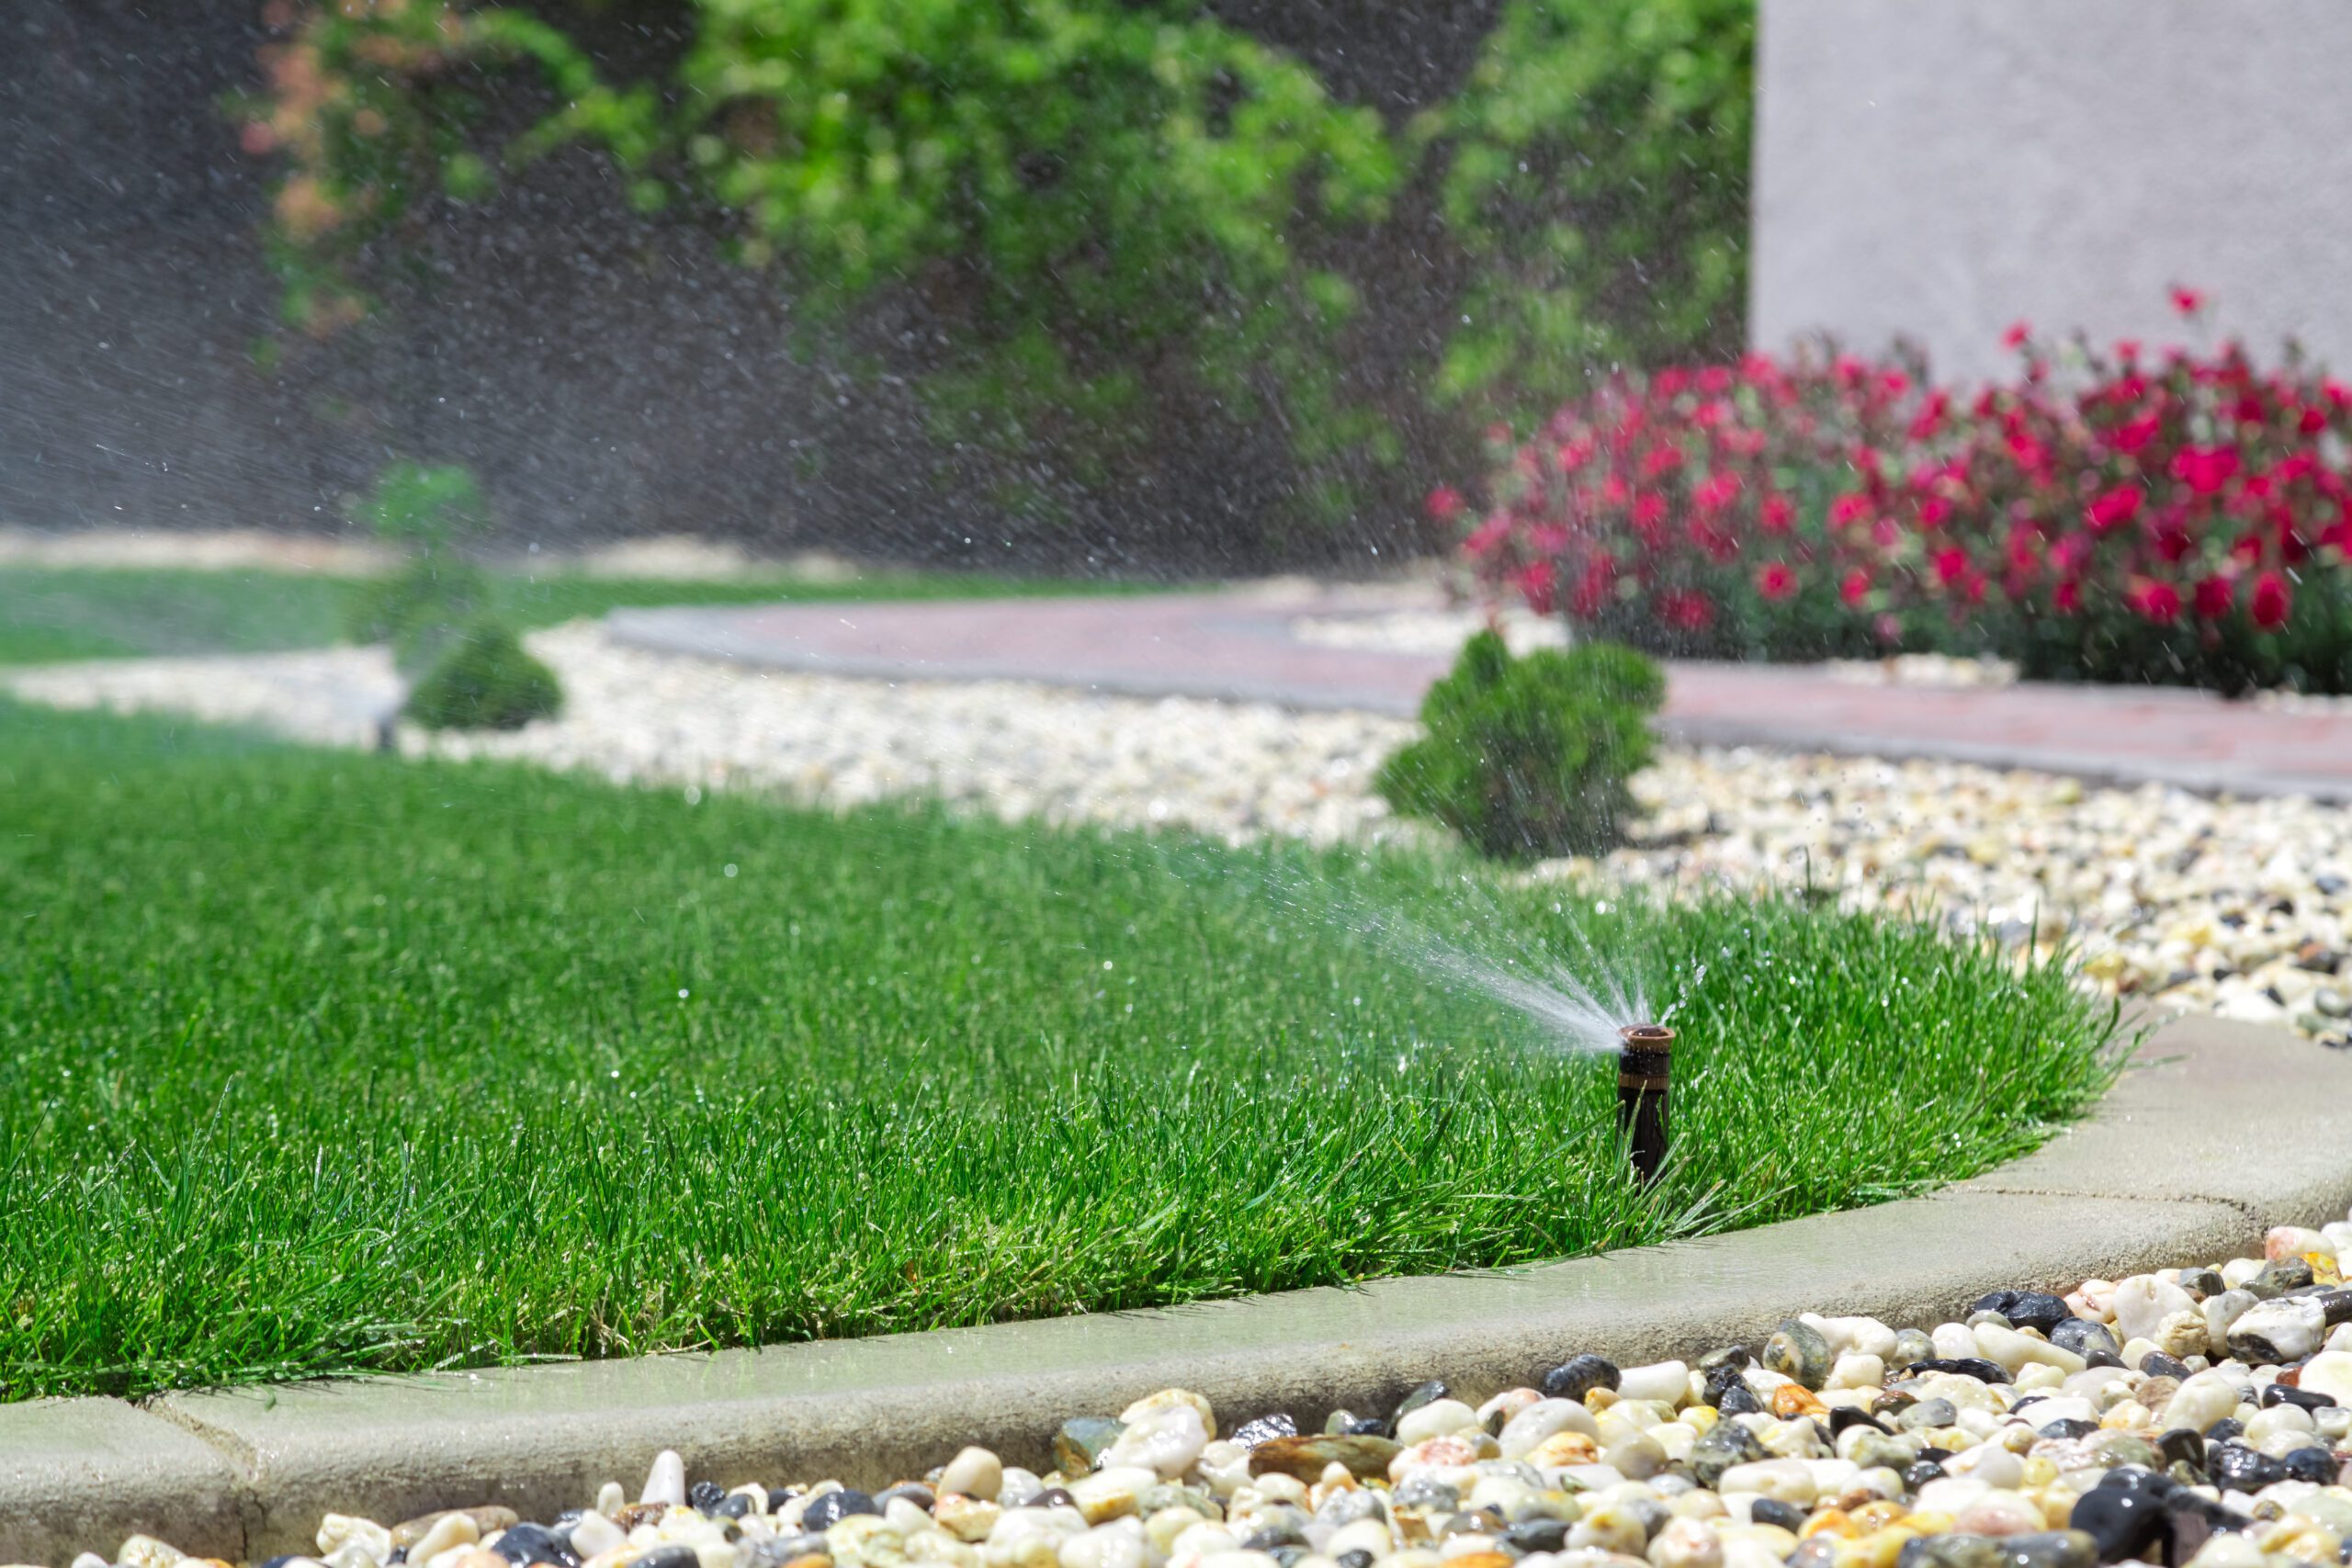
Proper watering is critical to your lawn’s health and vigor. Deep and infrequent watering is the best practice. This means wetting the soil to a depth of 3‐5 inches per irrigation. This equates to ½” of irrigation at a time.
Water during the morning rather than in the afternoon or evening; this allows the leaf blades to dry and reduces the risk of disease. Do not water every day or two. Frequent, short watering encourages shallow roots, unhealthy grass plants and turf susceptible to drought and disease.
Let the turf determine watering frequency. Since heat, humidity, and rainfall can vary, it’s best to water at the first signs of stress, not on a predetermined schedule. As a note, St. Augustine turf has poor drought tolerance and requires irrigation to survive during our long hot summers where Bermuda grasses are very draught tolerant and require less frequent irrigation but much deeper irrigation cycles.
Here are some guidelines and general tips to keep in mind when preparing your watering schedule. Each lawn and landscape is different and you should always check local weather conditions when planning.
(Normally June through mid to late September)
Early morning (5am to 10am)
It is best to water deeply, less frequently. Consult the temperature guide below.
Most lawns require 1″ to 1.25″ of water per week, split over several days.
(Normally November to February and May to June)
Water only during the daytime hours. Avoid water overnight.
If there is no rain for weeks, use manual cycle and water as needed (no more than once every 1-2 weeks).
Your run times should be adjusted based on how dry your yard is. Winter watering should have run times 50% less than your summer run schedule.
| Irrigation spray head averages | ||
| Head type | Minutes per week | Amount of water |
| Pop-up spray head | 25-35 minutes | 1″ |
| Rotary spray head | 50-70 minutes | 1″ |
| Overall Temperature Guide | |
| Temperature | Frequency of water |
| 60° F | Every 7 – 10 days |
| 70° F | Every 6 days |
| 80° F | Every 5 days |
| 90° F | Every 4 days |
| Over 95° F | Every 3 days |
Late Winter/Early Spring – Rainfall is usually adequate. Water if no rainfall for four weeks.
Water only once per week in the spring, if less than one inch of rainfall occurs.
During the summer, water each section heavily at least twice a week if less than one inch rainfall.
Early Fall is Brown Patch Season and excess water triggers this disease. During September water only once per week if no rainfall and every two weeks in October if no rain.
In late fall/early winter, rainfall is usually adequate. Water if no rainfall for four weeks
Water newer flowers 3 to 4 times per week for no more than 5 minutes.
Water newer trees using soaker hoses or direct hose drips once every couple of weeks.
Admit it — you have lawn envy. Everyone craves their own little patch of grassy paradise, whether it’s to boost their home’s curb appeal or to transform a boring backyard into a family-friendly oasis. Get our top steps to keep your yard healthy and lush 365 days a year.
Weed and feed is a spring ritual for many lawn enthusiasts but beware of overdoing it. Late spring is the best time to do this; just make sure you actually have a major weed problem before treating your entire lawn. Too many chemicals can stress the plant's roots, putting your lawn at risk during the intense heat of summer. Consider spot-spraying or pulling broadleaf weeds (dandelions) and applying slow-release fertilizer only if needed.
Once your lawn begins to green back up in the spring, you may notice a few dips or bare spots. Don't panic — you can deal with these areas by flushing the spot with water, raking out any dead grass, then leveling it out with sand and soil, as needed. Reseed with your grass variety and water regularly until the new grass is fully established.
Whether you’re starting from scratch or nursing an existing lawn back to health, seeding is an important task you want to get right. Early spring is a good time to do this. Just keep in mind that colder soil conditions may slow growth down a bit. You can also seed in the fall if you miss the window!
All grass needs water, and depending on the type of turf you have, that amount will vary. An in-ground irrigation system that operates off a timing system is best for helping to control how much water your yard is getting. Start giving it too much water too early and you could have a soppy mess of a yard. Early spring, while the temperatures overnight are still cool in Houston you won't need to water anymore than 1 to maybe 2 days a week. If rain is in the forecast, turn off that sprinkler and let mother nature go to work.
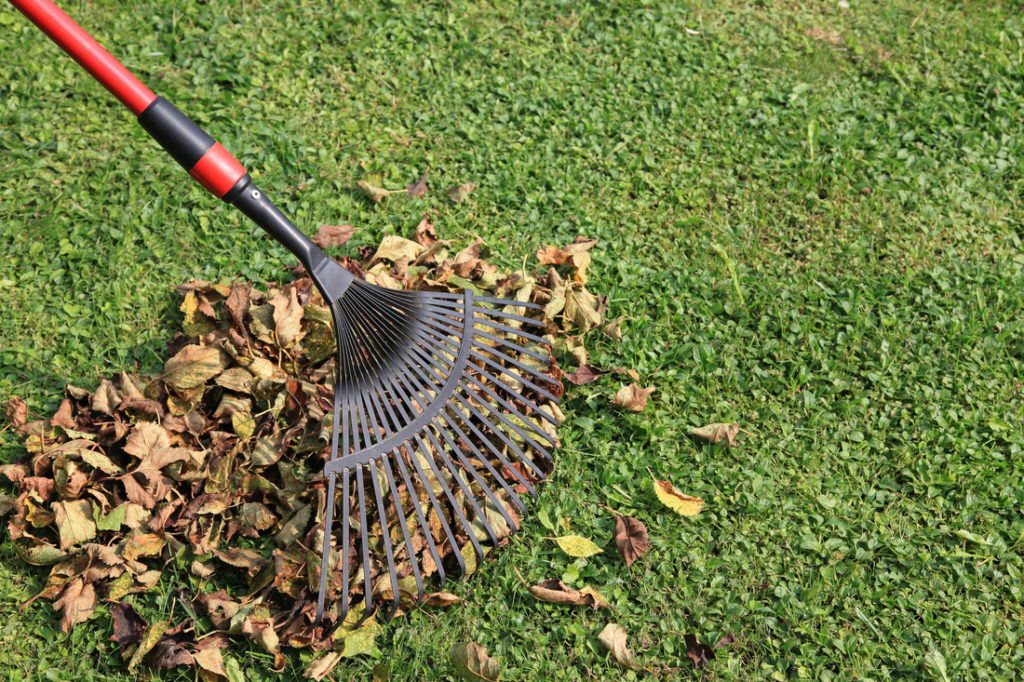
Your yard will need to start being mowed on a weekly basis once we get into mid-spring. The biggest reason mowing becomes so important is because this is when you will see the weeds start moving in. Regular cutting will help keep the weeds at bay.
Your grass clippings are essentially a natural mulch for your lawn. Clippings are rich in organic compounds and will help feed your lawn, so don’t bother bagging them up. Just make sure you mow when the lawn is dry so the clippings don’t clump up.
Spring is an excellent time to top all beds with a heavy layer of mulch. It keeps the soil moist and cool, but it also blankets out any weed seeds thinking of getting a head start on your perennials.
Spring is the best time to prevent weeds by using pre-emergent weed control, which work by preventing weed seeds from germinating. Your first application of a pre-emergent herbicide should occur just as the forsythia bushes finish blooming in spring – that should stop crabgrass and other weeds before they have a chance to grow.
Resist the urge to heavily fertilize your lawn in the spring. Spring feeding encourages rapid tender growth that will struggle to survive the heat of summer, particularly in drought-prone areas. Fertilize in late spring as soon as the lawn “greens up” and begins actively growing.
Spring is a good time to address problems with fire ants. Many other insects, such as grubs and mole crickets, may also cause damage to your lawn in spring but are more effectively controlled later in the summer.
It sounds like a lot to tackle on your own, but with a few weekends and a little bit of time, your yard will be looking it best year-round! We also offer a variety of lawn maintenance programs to help the burden of maintaining your lawn off of you. Besides the basics (mowing, weeding, pruning) we also offer items like mulchings, annual color plantings, fertilizing, large plant and tree trimming, herbicides and insecticide treatments as well as landscaping overhauls and smaller cleanups. If you need some help in your yard, just give us a call at (281) 859-2122 or contact us.
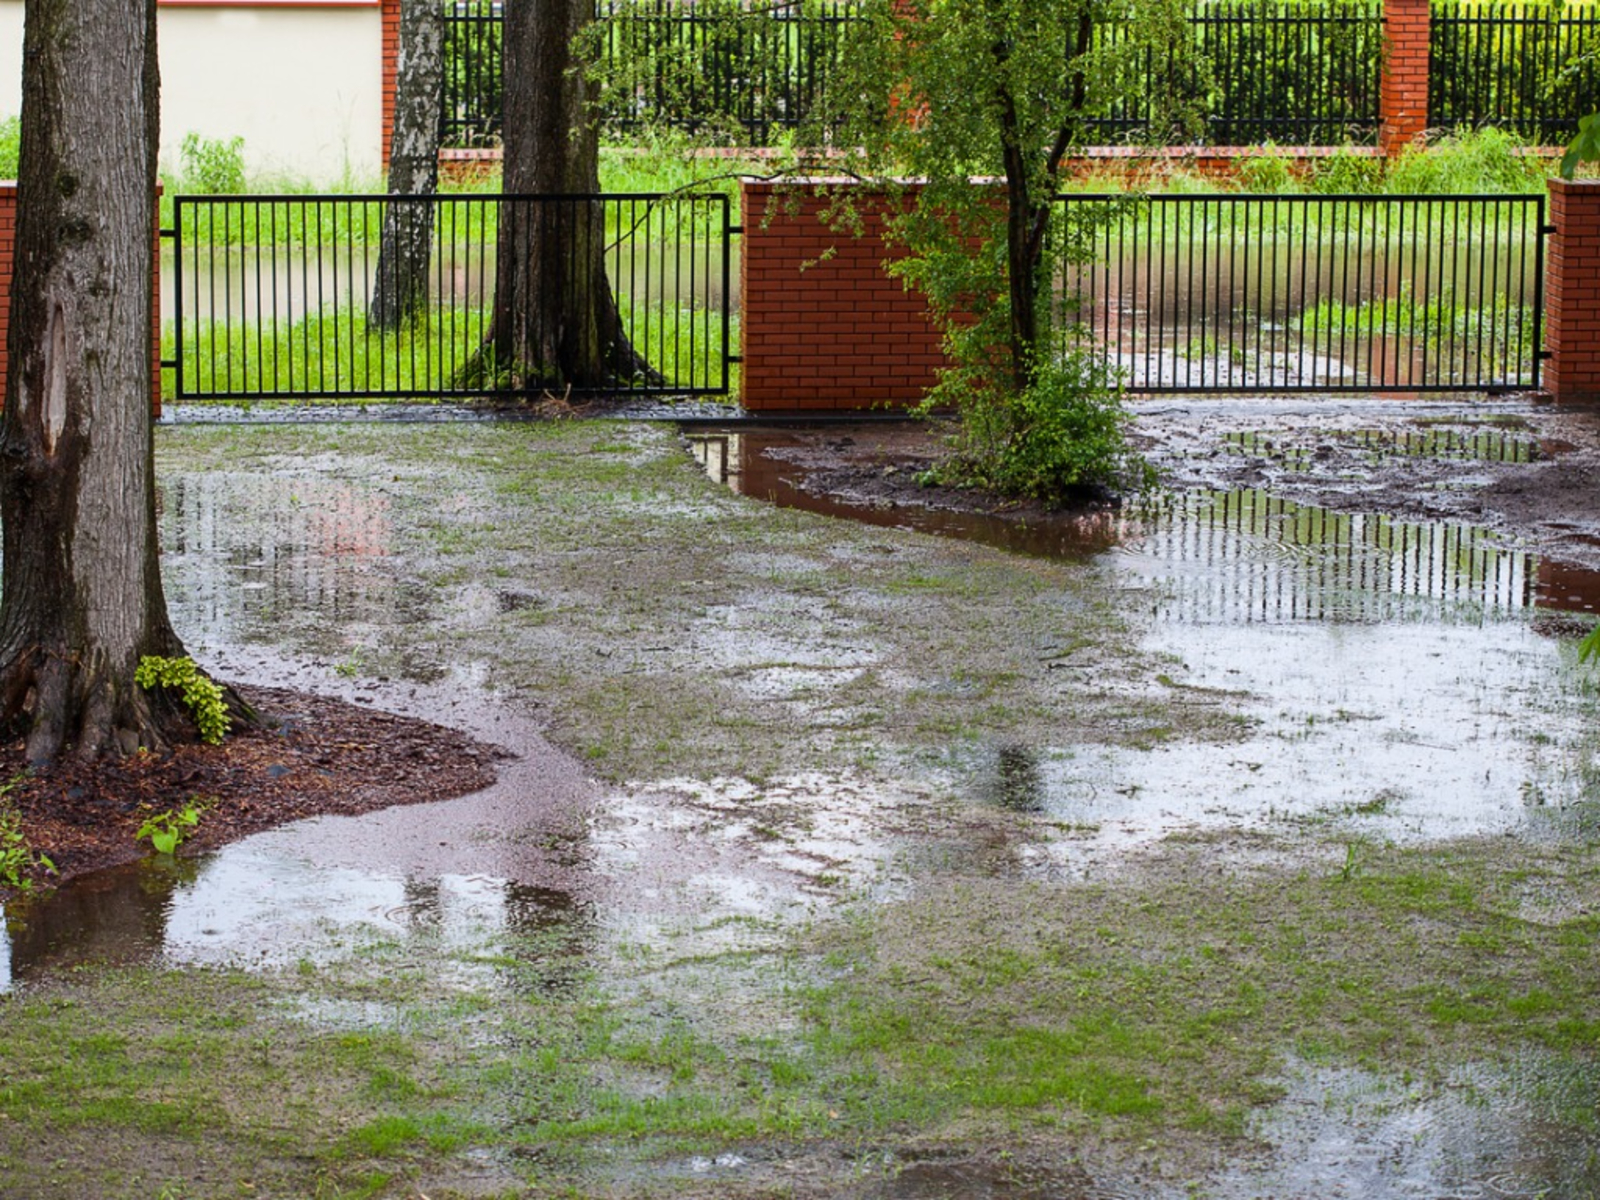
If your yard looks like the below photos after a heavy rain or multiple uses of your irrigation system, your yard has a problem draining properly. Standing water in your yard is not only visually unappealing but can create the perfect environment for unwanted guests like mosquitos.


Wet spots in your yard are a nuisance and an eyesore. Grass will die if it’s underwater for too long. You can’t mow over wet areas, and everyone tracks mud into the house. So what’s the fix? Here’s some tips to help your yard drain properly.
Landscaping near the house can create a basin for water. Extending the downspout usually solves the problem.
Roof gutters can divert water very efficiently. Make sure gutters are installed around the perimeter of your home to divert the water away from your yard and to the street.
The slope of your yard should angle away from your home to keep water directed towards the street and not your foundation. If the grade of your yard is not going in the right direction, reshaping may be in order.
Top dressing is a simple method to fix shallow depressions in your yard that collect water following a heavy rain. This method evens out low areas using layers of soil applied over existing grass. Apply a layer of soil to your lawn, 1/4 to 1/2 of inch thick, every eight to 12 weeks. Use dry soil and spread it evenly over the depression with a drop spreader or shovel.
If you have tried the above recommendations and are still having wet spots or standing water, you may need to look at a drainage system including box drains. Box drains are placed in low areas of your yard to help pull water out of your lawn and direct it to the street.
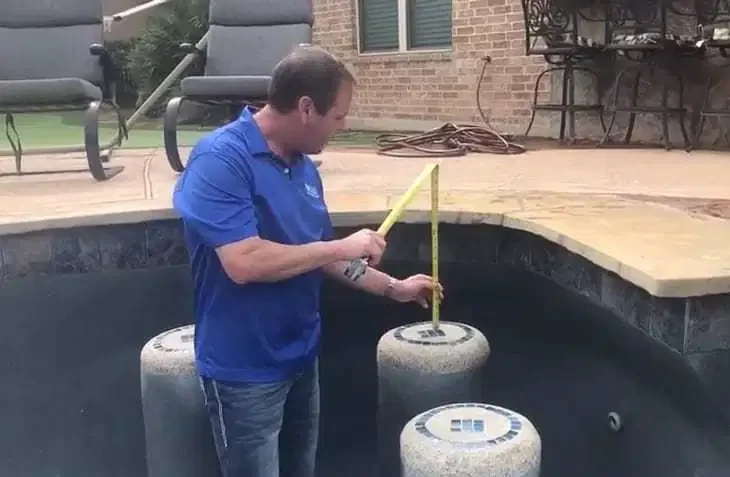
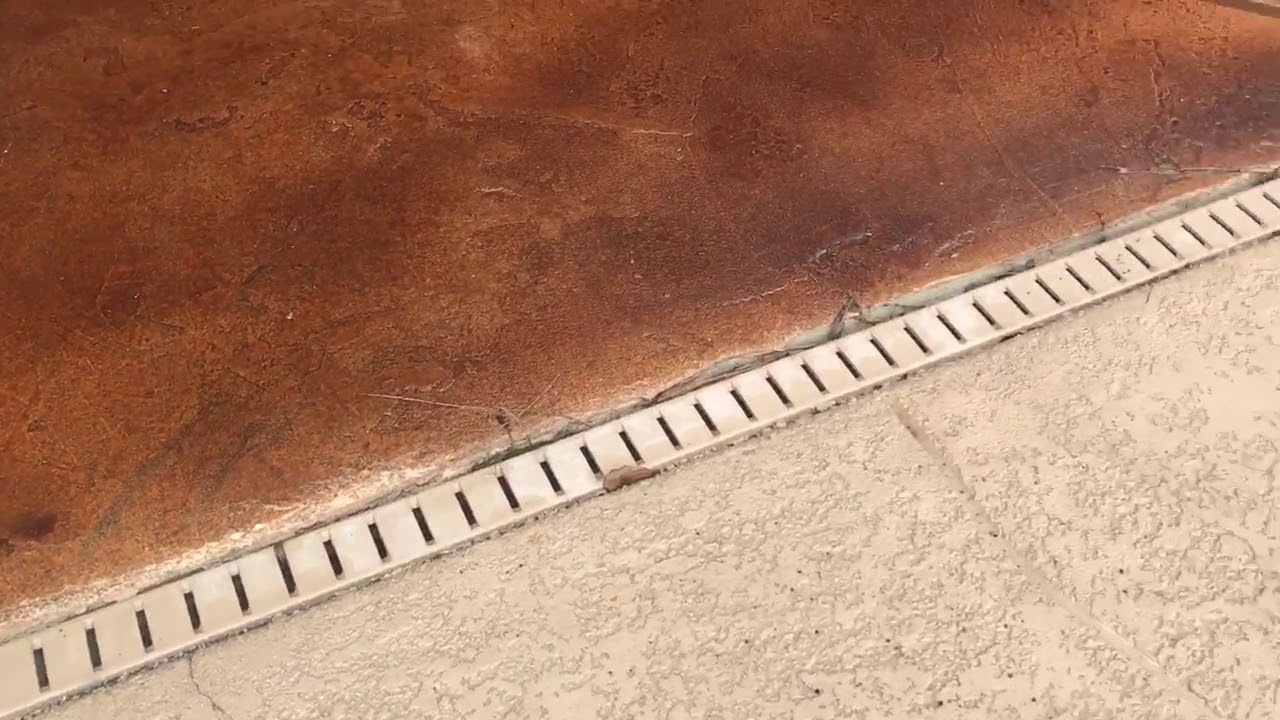
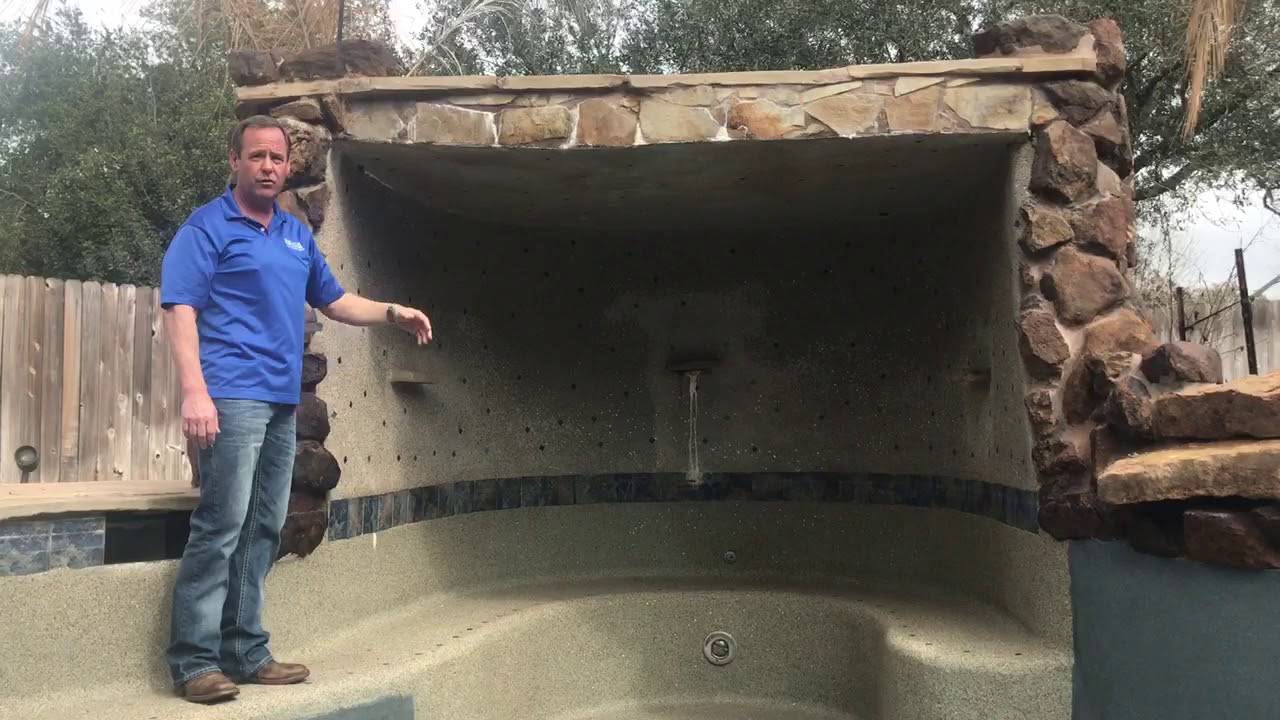
Finding a pool contractor to build your dream pool is not always an easy task. Doing research about the company you intend to hire is a vital part of the process. So you vetted a contractor, entered in the contractor, and the pool was built. But what if it wasn’t what you expected? What if the contractor never came back to address concerns and provide warranty on problems that arose only months after install?
Believe it or not, this DOES happen! And it happens more frequently than it should. One of our now clients happened to be put right in the middle of a situation just like this. Instead of receiving the pool he had been dreaming of, he received something much less that lacked on quality and wasn’t a representation of his vision.
Below are some videos outlining some items that you shouldn’t see in a pool build, and things that we here at Suncor Outdoors have set out to repair, replace and correct as necessary to make our customers vision come to life the way it was intended to be.


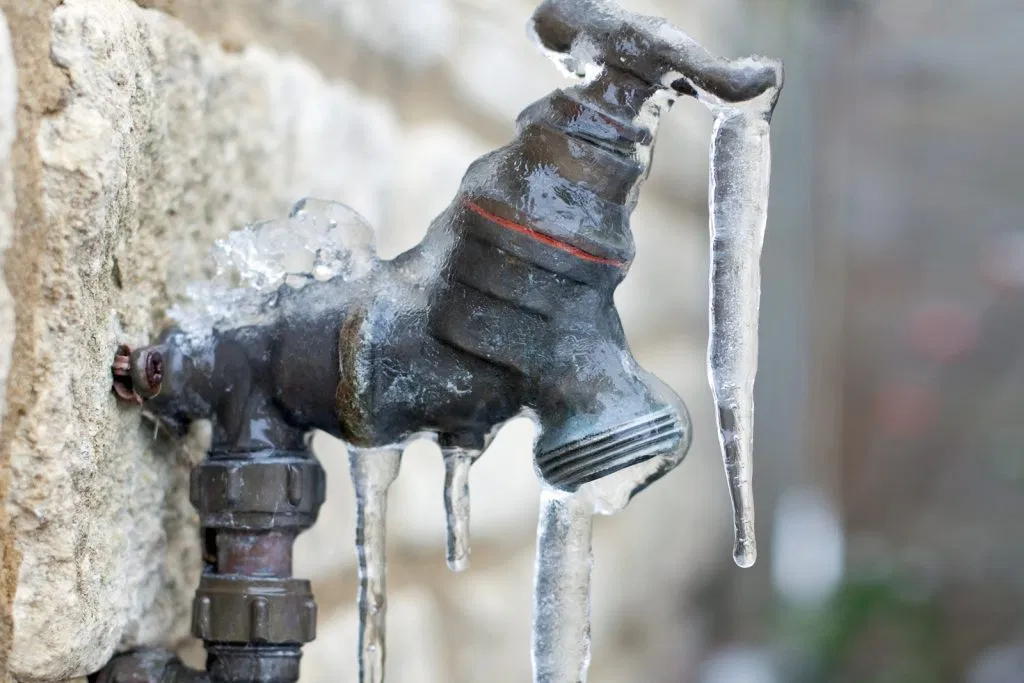
Cold weather is on the way! Freezing temperatures don’t happen too often in Houston, but when they do, it’s important to prepare! Taking the time to prepare your yard for the freeze could save you hundreds of dollars on burst pipes and plant replacement.
Our irrigation systems are simply not made to withstand multiple days below freezing-however by properly draining your back flow and depressurizing the sprinkler lines, we can limit the damage. There are so many variables that can cause one residents irrigation to freeze and the next door neighbors not to freeze, the biggest being is your backflow preventer (the bell on the side of your home) being exposed to the north.

Frozen pipes are one of the biggest property damage risks when the temperature drops. When water freezes inside a pipe, it expands and can burst pipes and cause extensive damage.